How to Install an Automatic Transfer Switch?
To install an Automatic Transfer Switch, follow these steps: ensure the power source is disconnected, mount the switch near the main electrical panel, connect the switch to the main panel and backup power source, and finally, test the switch to ensure proper functionality. Installing an Automatic Transfer Switch is a straightforward process that allows for seamless transition between utility power and backup power during a power outage.
With the switch in place, you can have peace of mind knowing that essential electrical systems will continue to operate uninterrupted. Whether you are a homeowner or a business owner, installing an Automatic Transfer Switch is a smart investment to protect against power disruptions.
Introduction To Automatic Transfer Switches
An automatic transfer switch (ATS) is a critical component of a standby power system, providing seamless and reliable transition between primary and backup power sources. Understanding the role and benefits of an ATS is essential for ensuring uninterrupted power supply during outages or disruptions.
The Role Of An Ats In Power Continuity
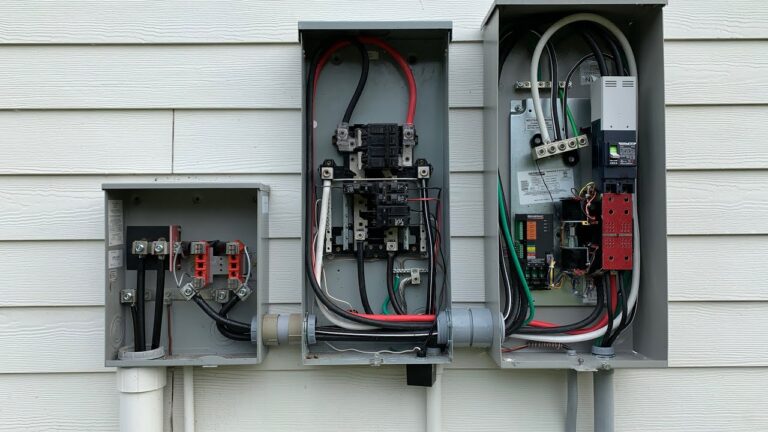
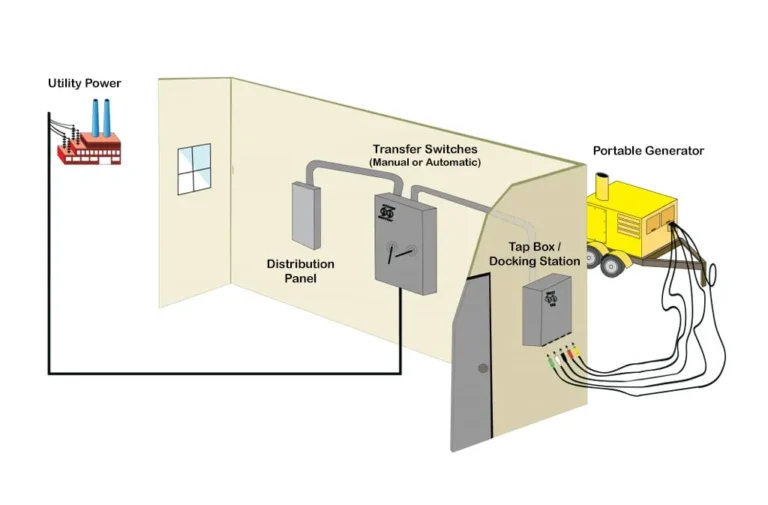
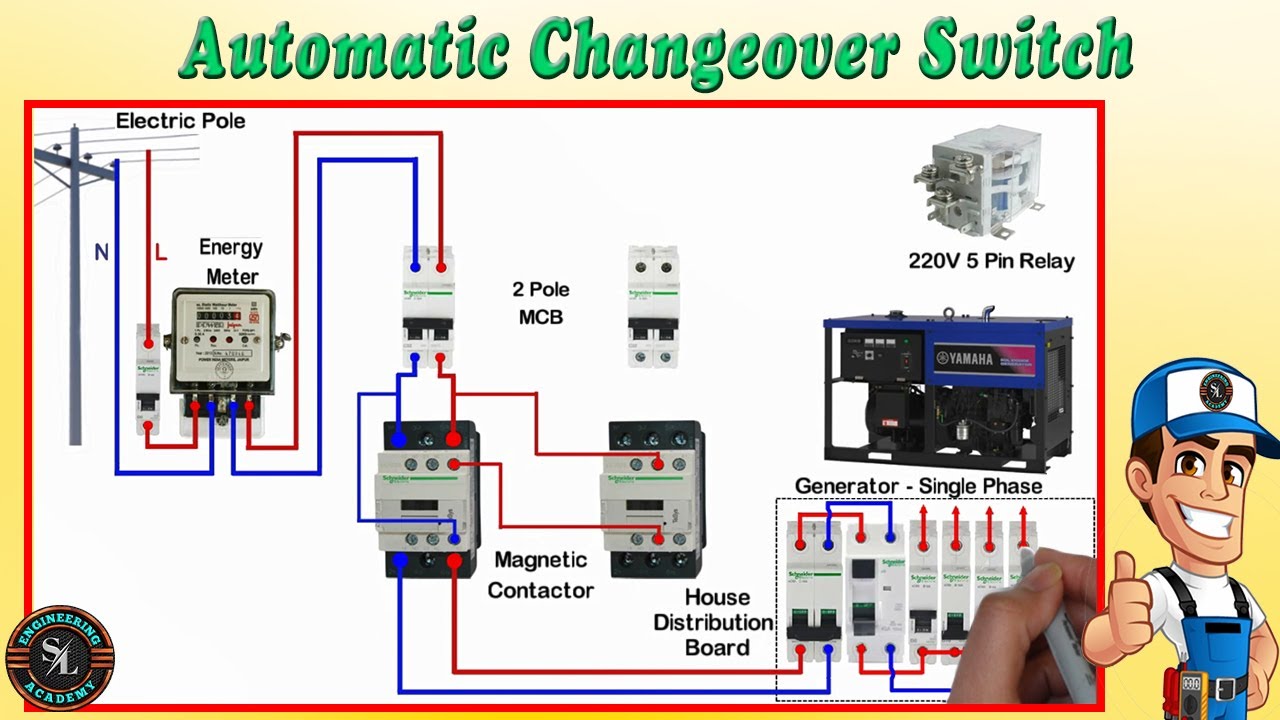
An ATS serves as the intermediary between the utility power supply and a backup generator, monitoring the availability and quality of the primary power source. When a power outage occurs, the ATS automatically initiates the transfer to the backup power supply, ensuring a smooth transition without any interruption to the connected loads. Once utility power is restored, the ATS switches the electrical load back to the primary source, all without manual intervention.
Benefits Of Installing An Ats
- Enhanced Reliability: An ATS ensures continuous power supply, safeguarding critical systems and minimizing downtime.
- Seamless Transition: The automatic transfer process eliminates the need for manual switching, reducing the risk of human error during power outages.
- Convenience: With an ATS in place, the switch between power sources occurs automatically, providing peace of mind for homeowners and businesses.
Pre-installation Considerations
Before installing an automatic transfer switch (ATS), it is crucial to consider several factors to ensure a safe and efficient installation. These pre-installation considerations can help you select the right ATS for your needs and ensure compliance with local electrical codes and regulations.
Selecting The Right Ats For Your Needs
When choosing an ATS, consider the power requirements of your home or business. Ensure the ATS can handle the electrical load during a power outage. It’s essential to select a reliable and durable ATS that meets the specific needs of your electrical system.
Understanding Local Electrical Codes And Regulations
Before installing an ATS, familiarize yourself with the electrical codes and regulations in your area. Ensure that the installation complies with all the local requirements and safety standards. Consulting with a qualified electrician can provide valuable insights into adhering to these regulations.
Tools And Materials Required
Installing an automatic transfer switch (ATS) is a crucial step in ensuring uninterrupted power supply to your home or business during power outages. To successfully install an ATS, you will need the following tools and materials:
List Of Essential Tools
- Screwdriver (Phillips and flathead)
- Wire strippers
- Wire cutters
- Drill
- Hammer
- Socket wrench set
- Measuring tape
- Level
Safety Equipment And Precautions
Before starting the installation process, it is important to prioritize safety. Ensure you have the following safety equipment and take necessary precautions:
- Safety glasses to protect your eyes from debris
- Gloves to protect your hands
- Ear protection if using power tools
- Proper clothing to avoid loose ends getting caught in machinery
- Turn off the main power supply to prevent electrical accidents
- Disconnect any power sources connected to the transfer switch
- Follow manufacturer’s instructions and guidelines at all times
By having the right tools, safety equipment, and following necessary precautions, you are ready to begin the installation process of an automatic transfer switch.

Preparing For Installation
Before installing an automatic transfer switch (ATS), it is crucial to make necessary preparations to ensure a safe and efficient installation process. This section will guide you through the steps involved in preparing for the installation, including power shutdown and safety measures, as well as site preparation and ATS positioning.
Power Shutdown And Safety Measures
Before starting the installation, it is essential to shut down the power supply to the electrical system. This ensures the safety of the installers and prevents any electrical accidents. Here are the steps to follow:
- Identify the main electrical panel in your home or facility.
- Locate the main circuit breaker and switch it off to cut off the power supply.
- Use a voltage tester to double-check and ensure that there is no power running through the circuits.
- Inform all individuals in the vicinity about the power shutdown to avoid any accidental injuries or damage.
Once the power shutdown is complete, it is time to take the necessary safety measures before proceeding with the installation. Here are some important precautions to consider:
- Wear appropriate personal protective equipment (PPE) such as gloves, safety glasses, and non-conductive footwear.
- Ensure the work area is well-lit to minimize any potential hazards.
- Keep all tools organized and in good condition to prevent accidents.
- Read and follow the manufacturer’s instructions and safety guidelines for the ATS installation.
Site Preparation And Ats Positioning
Proper site preparation and positioning of the automatic transfer switch are crucial for its optimal performance. Follow these steps to prepare the installation site:
- Choose a location near the main electrical panel where the ATS can be easily accessed.
- Ensure there is sufficient space around the ATS for proper ventilation and maintenance.
- Clear the area of any debris or obstacles that might hinder the installation process.
- Check the weight and dimensions of the ATS to ensure that the chosen location can support it.
Positioning the ATS correctly is vital to ensure its efficient operation. Here are some guidelines to follow:
- Mount the ATS on a sturdy, level surface using appropriate mounting brackets or hardware.
- Ensure that the ATS is positioned in a way that allows easy access for maintenance and servicing.
- Align the ATS with the main electrical panel and ensure that the connection points are easily accessible.
- Refer to the manufacturer’s instructions for any specific requirements regarding the positioning of the ATS.
By following these steps for power shutdown, safety measures, site preparation, and ATS positioning, you can ensure a smooth and successful installation of an automatic transfer switch.
Electrical Connections
To install an automatic transfer switch, start by turning off the main power source. Then, connect the switch to the electrical panel and the generator. Test the system to ensure proper functioning and safety. Finally, turn on the generator to activate the automatic transfer switch.
Wiring The Ats To Your Power Sources
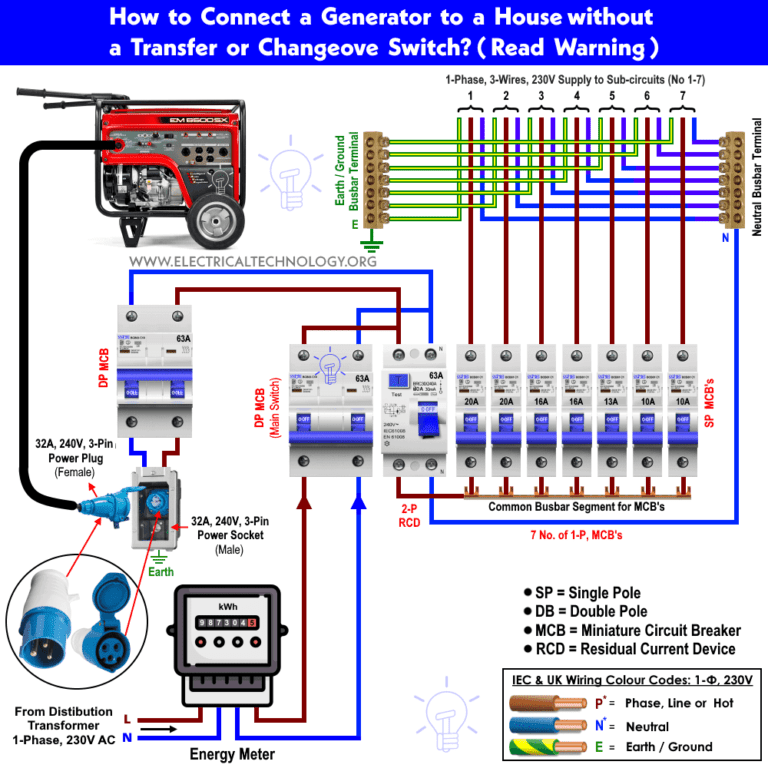
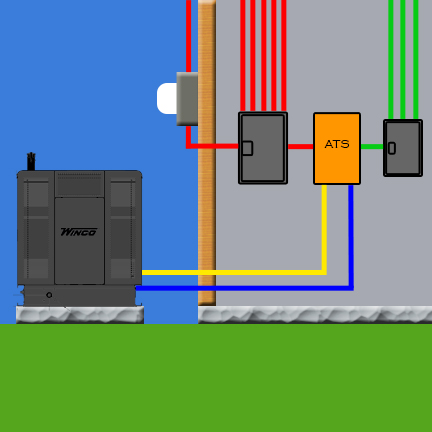
To start wiring your automatic transfer switch (ATS), you need to connect it to your power sources. This involves connecting the utility power source to the ATS and the generator power source to the ATS. The ATS will then detect any power outages and switch the power source to the generator automatically.
To connect the utility power source, first, turn off the power at the main breaker. Then, connect the utility power cables to the ATS utility input terminals. Next, connect the generator power cables to the ATS generator input terminals. Be sure to follow the manufacturer’s instructions for proper cable sizing and connections.
Critical Load Connections
After connecting the power sources, you need to connect the critical load to the ATS. This involves connecting the load cables to the ATS load output terminals. The critical load refers to the essential appliances and systems that need to be powered during a power outage, such as heating and cooling systems, refrigerators, and medical equipment.
To connect the critical load, identify the circuits that power the critical load and connect them to the ATS load output terminals. Be sure to follow the manufacturer’s instructions for proper cable sizing and connections.
In conclusion, wiring the ATS to your power sources and critical load connections is essential to ensure that your automatic transfer switch functions properly during a power outage. Be sure to follow the manufacturer’s instructions and hire a licensed electrician if needed.
Testing The Ats
To install an automatic transfer switch, one must first test the ATS to ensure it is functioning properly. This involves checking the connections, testing the circuit breaker, and ensuring the switch can handle the load. Proper installation of an ATS is crucial for ensuring uninterrupted power during a power outage.
Testing the ATS is a crucial step in the installation process of an Automatic Transfer Switch (ATS). Manual testing procedures and simulating power outage for automatic functionality check are the two main methods to ensure that the ATS is functioning correctly and ready to switch power sources seamlessly.
Manual Testing Procedures
Manual testing procedures involve checking the ATS under normal power supply conditions. This procedure involves turning on the power supply and verifying that the ATS is receiving power. The next step is to turn off the power supply and monitor the ATS to ensure that it switches to the secondary power source. This step is crucial in ensuring that the ATS can detect and switch power sources automatically.
Simulating Power Outage For Automatic Functionality Check
Simulating a power outage is another essential step in testing the ATS. This procedure involves disconnecting the primary power source and monitoring the ATS to ensure that it switches to the secondary power source automatically. This step is vital in verifying that the ATS can detect a power outage and switch to the secondary power source without any delay.
It is important to note that proper testing of the ATS can prevent power outages and ensure that your home or business stays powered during an outage. Therefore, it is crucial to follow the manual testing procedures and simulate a power outage to ensure that the ATS is functioning correctly.
In conclusion, testing the ATS is a critical step in ensuring that your home or business stays powered during a power outage. Manual testing procedures and simulating a power outage are the two main methods to verify that the ATS is functioning correctly and ready to switch power sources seamlessly.
Troubleshooting Common Issues
In troubleshooting common issues related to installing an automatic transfer switch, it’s crucial to ensure proper wiring and connections. Follow manufacturer instructions carefully to avoid potential electrical hazards and ensure a seamless installation process. Regularly inspect and test the transfer switch to preempt any operational issues.
Addressing Installation Errors
When it comes to installing an automatic transfer switch (ATS), it is important to address any installation errors that may arise. Even the smallest mistakes can lead to significant issues and potentially compromise the functionality of the ATS system. By being aware of common installation errors and taking the necessary steps to address them, you can ensure a smooth and efficient installation process.
1. Double-checking electrical connections
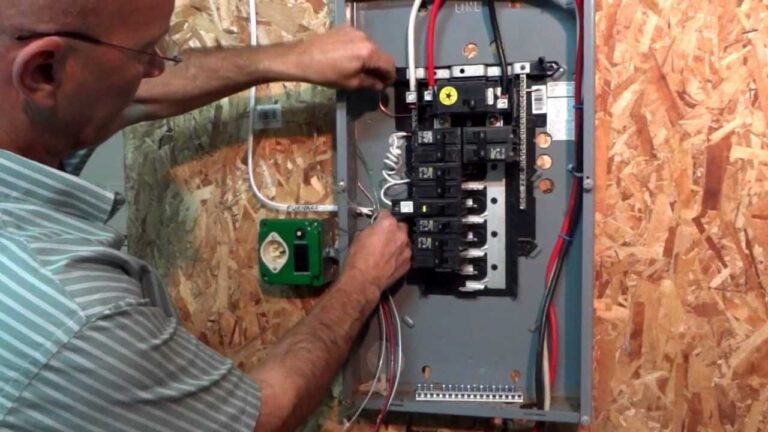
One common installation error involves incorrect electrical connections. It is crucial to double-check all electrical connections to ensure they are properly secured and tightened. Loose or improperly connected wires can lead to power interruptions or even electrical hazards. Take the time to meticulously follow the manufacturer’s instructions and guidelines for wiring the transfer switch.
2. Verifying proper grounding
Another important aspect of the installation process is verifying proper grounding. The ATS should be connected to a reliable and effective grounding system to ensure safety and functionality. Improper grounding can result in electrical malfunctions or damage to the transfer switch. Use a grounding electrode system that meets the required standards and consult with a professional electrician if you have any doubts.
3. Checking for compatibility
Before installing an ATS, it is crucial to check for compatibility with your existing electrical system. Ensure that the transfer switch is compatible with the voltage and frequency of your power supply. Failure to do so can result in operational issues and potential damage to both the ATS and your electrical equipment. Refer to the manufacturer’s specifications and consult with an expert if you are unsure about compatibility.
Resolving Operational Glitches
While an automatic transfer switch is designed to seamlessly transfer power during a utility outage, operational glitches can still occur. Troubleshooting these glitches promptly is essential to maintain uninterrupted power supply and prevent any potential damage. Here are some common operational issues that you may encounter and the steps to resolve them.
1. Resetting tripped circuit breakers
If your ATS fails to transfer power to the backup source during an outage, it could be due to a tripped circuit breaker. Check the circuit breakers in both the main power panel and the transfer switch to ensure they are properly set. If any breakers have tripped, reset them and test the transfer switch to confirm that it is functioning correctly.
2. Verifying proper voltage and frequency settings
Incorrect voltage or frequency settings can cause operational glitches in an ATS. Ensure that the voltage and frequency settings on the transfer switch align with your power supply. Any discrepancies can result in power transfer failures or damage to connected equipment. Make sure to consult the manufacturer’s instructions or seek professional assistance to adjust the settings accurately.
3. Inspecting for mechanical malfunctions
Mechanical malfunctions can also impact the performance of an automatic transfer switch. Regularly inspect the transfer switch for any signs of wear, loose connections, or damaged components. Pay close attention to the motorized mechanisms and ensure they are operating smoothly. If you notice any issues, contact a qualified technician to diagnose and repair the problem.
In conclusion, troubleshooting common issues when installing and operating an automatic transfer switch is crucial for ensuring a reliable and uninterrupted power supply. By addressing installation errors and promptly resolving operational glitches, you can maximize the functionality and longevity of your ATS system. Remember to consult the manufacturer’s instructions and seek professional assistance when needed to ensure a successful installation and proper troubleshooting.
Maintenance And Upkeep
Learn how to install an automatic transfer switch for efficient maintenance and upkeep of your electrical system. Follow these simple steps to ensure a smooth transition of power during outages, providing convenience and peace of mind.
Maintenance and Upkeep
Routine Maintenance Schedule
To ensure the reliable and efficient operation of your automatic transfer switch (ATS), it is crucial to establish a routine maintenance schedule. By adhering to a regular maintenance routine, you can prolong the lifespan of your ATS and minimize the risk of unexpected failures. Here is a simple routine maintenance schedule to follow:
1. Monthly Visual Inspection: Perform a visual inspection of the ATS to check for any signs of damage, loose connections, or abnormal wear. Ensure that all cables and wiring are properly secured and free from any obstructions.
2. Quarterly Testing: Conduct a comprehensive testing procedure every three months to verify the functionality of the ATS. This includes simulating a power outage and confirming that the switch transfers power seamlessly from the utility to the backup generator.
3. Annual Cleaning: Once a year, clean the ATS thoroughly to remove any dust, debris, or other contaminants that may hinder its performance. Use a soft cloth or brush to gently wipe the exterior surfaces and ensure proper airflow around the unit.
Long-Term Care for Reliability
To maintain the reliability of your automatic transfer switch over the long term, there are additional steps you can take. These measures will help prevent major issues and ensure the continuous operation of your backup power system.
1. Regular Load Testing: Periodically perform load testing on your ATS to assess its capacity to handle the anticipated electrical load during a power outage. This will help identify any potential weaknesses or limitations in the system.
2. Lubrication: Apply a suitable lubricant to the moving parts of the ATS, such as the transfer switch mechanism, to prevent friction and ensure smooth operation. Consult the manufacturer’s guidelines for the recommended lubrication schedule and type of lubricant to use.
3. Professional Inspection: Schedule regular inspections by a qualified technician to assess the overall condition of your ATS. They can identify any underlying issues and perform necessary repairs or replacements to maintain optimal performance.
By following a routine maintenance schedule and implementing long-term care practices, you can maximize the reliability and lifespan of your automatic transfer switch. Remember to consult the manufacturer’s guidelines and seek professional assistance when necessary to ensure proper maintenance and upkeep of your ATS.
Routine Maintenance Schedule
1. Monthly Visual Inspection
– Check for damage, loose connections, and abnormal wear.
– Secure cables and wiring.
– Remove any obstructions.
2. Quarterly Testing
– Simulate power outage and verify seamless power transfer.
– Confirm functionality of the ATS.
3. Annual Cleaning
– Thoroughly clean ATS to remove dust and debris.
– Use a soft cloth or brush.
– Ensure proper airflow.
Long-Term Care for Reliability
1. Regular Load Testing
– Assess capacity to handle electrical load.
– Identify weaknesses or limitations.
2. Lubrication
– Apply suitable lubricant to moving parts.
– Prevent friction and ensure smooth operation.
3. Professional Inspection
– Schedule regular inspections by qualified technician.
– Identify underlying issues and perform necessary repairs.
By following these maintenance and upkeep practices, you can maximize the reliability and lifespan of your automatic transfer switch. Consult manufacturer’s guidelines and seek professional assistance when needed.
Final Thoughts
Discover how to easily install an automatic transfer switch in your home with these simple steps. From proper wiring to safety precautions, this guide will help you seamlessly integrate this essential device into your electrical system. Get started today and enjoy the convenience and peace of mind that an automatic transfer switch brings.
Ensuring Compliance With Standards
An important aspect of installing an automatic transfer switch (ATS) is ensuring compliance with industry standards and regulations. This ensures the safety and reliability of the transfer switch system, reducing the risk of potential hazards. Before installation, it’s crucial to thoroughly review and understand the specific standards and codes relevant to automatic transfer switches, such as those outlined by the National Electrical Code (NEC) and the Occupational Safety and Health Administration (OSHA).
The Value Of Professional Installation
Professional installation of an automatic transfer switch holds significant value. By enlisting the expertise of qualified professionals, the installation process is carried out with precision and adherence to best practices. Professional installers have the knowledge and experience to navigate potential challenges, ensuring the seamless integration of the transfer switch into the electrical system. This not only guarantees optimal performance but also provides peace of mind knowing that the installation has been executed to the highest standards.
Frequently Asked Questions
Can I Install A Transfer Switch Myself?
Yes, you can install a transfer switch yourself. However, it’s essential to have the necessary electrical knowledge and follow safety guidelines. If you’re unsure, it’s best to hire a professional electrician.
Where To Install Automatic Transfer Switch?
The automatic transfer switch should be installed near the main electrical panel. It should also be easily accessible and away from any potential hazards or obstructions. It is recommended to consult with a licensed electrician for proper installation and to ensure compliance with local codes and regulations.
How Much Does It Cost To Install An Automatic Transfer Switch?
The cost of installing an automatic transfer switch typically ranges from $500 to $2,000. Factors such as the switch size, brand, and installation complexity can influence the final price. It’s best to consult with a licensed electrician for an accurate estimate.
What Is The Disadvantage Of Automatic Transfer Switch?
The disadvantage of an automatic transfer switch is the potential for mechanical failure and increased installation and maintenance costs. Additionally, it may not be suitable for all power needs and could require a backup power source.
Conclusion
Installing an automatic transfer switch is a crucial step in ensuring a seamless power supply during outages. By following the proper guidelines and safety precautions, you can successfully set up this essential equipment. With a reliable automatic transfer switch in place, you can rest assured that your home or business will remain powered up when the unexpected strikes.