How to Install Manual Transfer Switch?
To install a manual transfer switch, follow these steps: first, turn off the main power supply; then, mount the transfer switch near the electrical panel; next, connect the transfer switch to the electrical panel; after that, connect the power inlet box to the transfer switch; finally, connect the generator to the transfer switch and start it up. Installing a manual transfer switch ensures a safe and efficient transfer of power during a power outage, allowing you to easily switch between your main power source and a backup generator.
With the following steps, you can install a manual transfer switch and have peace of mind knowing you have a reliable backup power solution.

Introduction To Manual Transfer Switches
When it comes to ensuring a seamless and safe transition of power during an outage, manual transfer switches play a crucial role. Understanding the purpose, key components, and installation process of these switches is essential for homeowners and businesses alike.
Purpose And Importance
Manual transfer switches serve as a vital link between a backup power source, such as a generator, and essential electrical circuits within a building. Their primary purpose is to enable a quick and safe switch from the main power supply to the backup source during an outage, ensuring continuous electricity supply to critical appliances and systems.
Key Components
Manual transfer switches consist of several essential components that facilitate the transfer of power. These include a sturdy, weatherproof enclosure, a double-throw safety switch, and a set of electrical connectors. The enclosure is designed to protect the switch and wiring from environmental elements, while the double-throw switch enables the seamless transition of power between the main supply and the backup source. Additionally, the electrical connectors ensure secure and efficient power transfer between the switch and the backup power system.
Safety Precautions
When installing a manual transfer switch, it’s crucial to prioritize safety precautions to prevent electrical hazards and accidents. By following these safety measures, you can ensure a secure and successful installation process.
Personal Protective Equipment
Before starting the installation, ensure you have the necessary personal protective equipment (PPE). This includes safety goggles, insulated gloves, and non-conductive footwear to protect against potential electrical shocks and hazards.
Electrical Safety Measures
When working with electrical components, always adhere to the following safety measures:
- Turn off the main power supply to the building to avoid electrical accidents.
- Use insulated tools to minimize the risk of electric shock.
- Ensure the work area is well-lit to clearly see and handle the electrical components.
Tools And Materials Required
Installing a manual transfer switch is a crucial step to ensure a smooth transition of power supply during emergencies. To successfully complete this installation, you will need a list of necessary tools and materials. Let’s take a look at what you’ll need:
List Of Necessary Tools
Before you begin the installation process, make sure you have the following tools at hand:
- Screwdriver
- Wire stripper
- Wire connectors
- Electrical tape
- Drill
- Hammer
- Measuring tape
- Level
Selecting The Right Transfer Switch
Choosing the right transfer switch is essential to ensure a seamless transfer of power between your main electrical supply and the backup generator. Here are a few key factors to consider:
- Capacity: Determine the power requirements of your home or business to select a transfer switch that can handle the load.
- Type: Decide whether you need a manual transfer switch or an automatic transfer switch based on your specific needs and budget.
- Installation: Consider the ease of installation and compatibility with your existing electrical system.
- Safety Features: Look for transfer switches that offer features like surge protection and grounding to safeguard your electrical equipment.
By carefully selecting the right transfer switch and having the necessary tools and materials, you can proceed with confidence to install your manual transfer switch. Remember to follow all safety precautions and consult a professional electrician if needed.
Preparing For Installation
Before you begin the installation process of a manual transfer switch, it is crucial to make sure you are properly prepared. This will ensure a smooth and safe installation process. In this section, we will guide you through the initial setup steps and shutting off power, which are essential tasks to complete before proceeding with the installation.
Initial Setup Steps
- Start by gathering all the necessary tools and equipment needed for the installation. These may include a screwdriver, wire strippers, electrical tape, and a voltage tester.
- Read the manual and familiarize yourself with the instructions provided by the manufacturer. This will give you a clear understanding of the installation process and any specific requirements.
- Inspect the area where the transfer switch will be installed. Ensure that there is enough space, and that the location is easily accessible for future maintenance or repairs.
- Check the electrical panel to determine if it has the capacity to accommodate the transfer switch. Verify that there are enough circuit breaker slots available and that the panel is in good condition.
- Ensure that you have the necessary permits and approvals from local authorities before starting the installation. Compliance with regulations is essential to maintain safety and avoid any legal issues.
Shutting Off Power
Prior to installing the manual transfer switch, it is crucial to shut off power to the electrical system. This step is essential to prevent any accidents or electrical shocks during the installation process. Follow these steps to ensure a safe power shutdown:
- Locate the main electrical panel in your home or building. This panel is usually located in a utility room, basement, or garage.
- Identify the main circuit breaker, which is typically larger than the rest and may be labeled as the “main” or “service” breaker.
- Switch the main circuit breaker to the “off” position. This will cut off power to the entire electrical system.
- To ensure that the power is completely shut off, use a voltage tester to check for any live electrical wires or connections. Follow the instructions provided with the voltage tester to perform the test safely.
- Once you have confirmed that the power is off, you can proceed with the installation of the manual transfer switch.
By following these initial setup steps and properly shutting off power, you will be well-prepared to install a manual transfer switch. Taking the time to prepare adequately ensures a safer installation process and helps to avoid any potential complications or hazards.
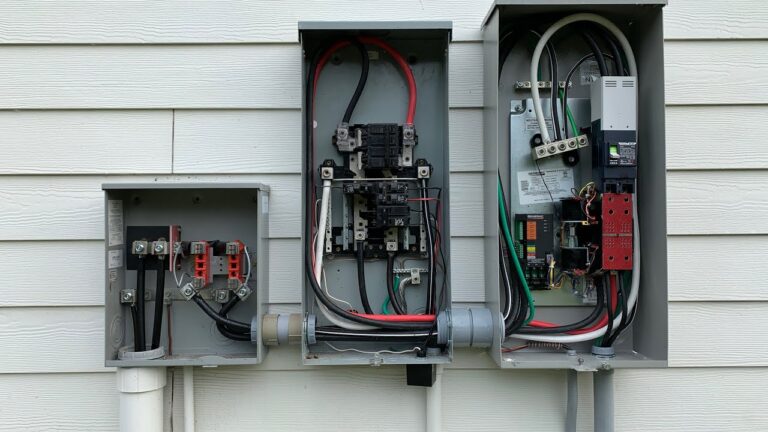
Mounting The Transfer Switch
To install a manual transfer switch, start by mounting the transfer switch to the wall near the existing main electrical panel. Ensure it is easily accessible and there is enough space for the necessary wiring connections. Follow the manufacturer’s instructions for specific mounting requirements to ensure a safe and secure installation.
Mounting the Transfer Switch is a crucial step in installing a Manual Transfer Switch, which allows you to switch power sources between your generator and the utility power. Choosing the right location and securing the transfer switch are important aspects to consider during this process.
Choosing The Location
When selecting the location for the transfer switch, it’s important to choose a dry and safe place that’s easily accessible. The location should be close to the utility meter and the main electrical panel. To ensure adequate ventilation, avoid mounting the transfer switch in a closet or near flammable materials. Also, make sure the location allows for easy cable routing between the transfer switch and the main electrical panel.
Securing The Transfer Switch
Once you’ve chosen the location for your transfer switch, it’s time to secure it. Start by mounting the transfer switch on a sturdy surface using the screws and anchors provided in the installation kit. If you’re mounting the transfer switch on drywall, use toggle bolts for added stability. Make sure the transfer switch is level before securing it to the surface.
Next, connect the transfer switch to the main electrical panel using the appropriate cables and connectors. Make sure to follow the manufacturer’s instructions carefully and use the correct wire gauge for the load. Once you’ve connected the cables, double-check to ensure they are secure and free of any damage or fraying.
In conclusion, mounting the transfer switch is an essential step in installing a manual transfer switch. Choosing the right location and securing the transfer switch properly will ensure safe and reliable operation during power outages.
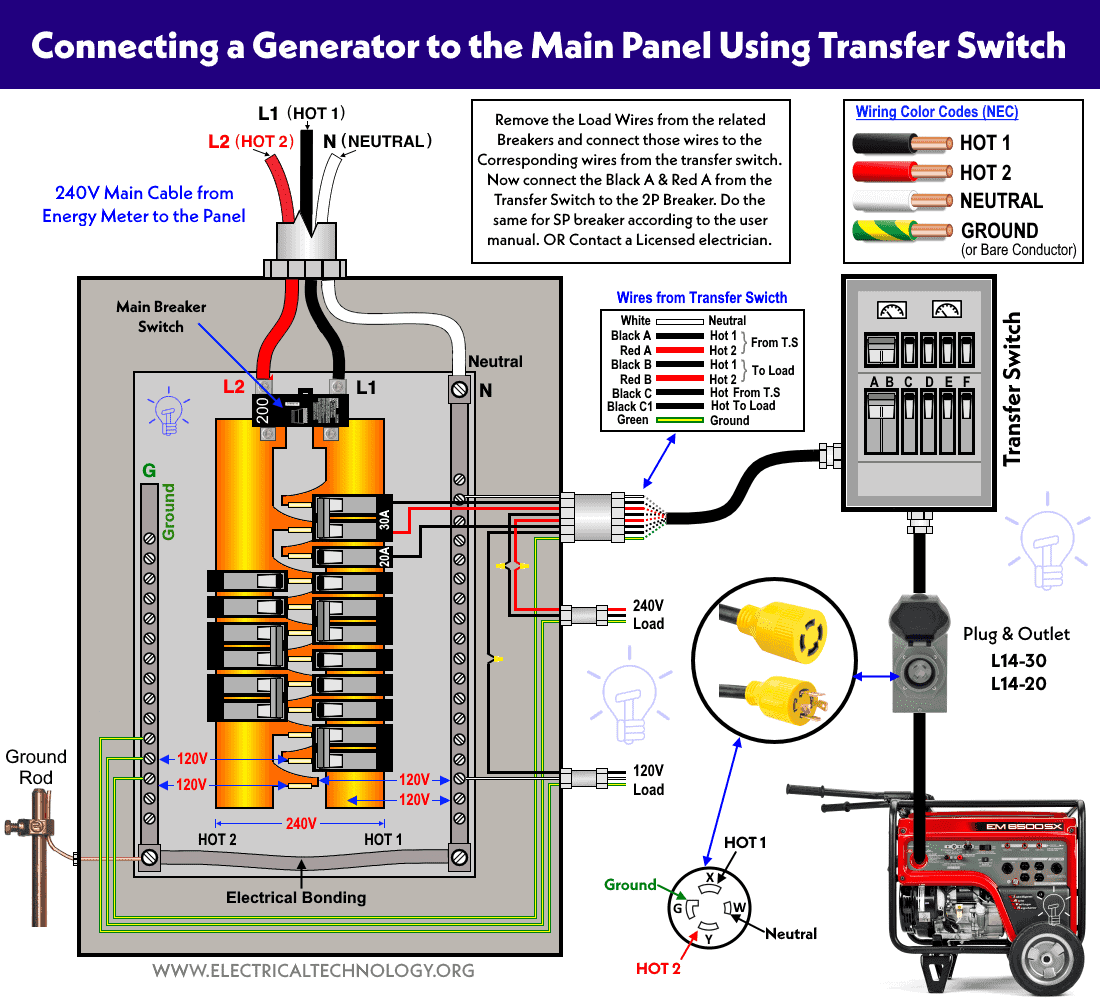
Wiring The Transfer Switch
To install a manual transfer switch, begin by wiring the transfer switch to the main electrical panel. Turn off the power, connect the transfer switch to the circuits, and then test the system to ensure proper functioning. Following the manufacturer’s instructions, secure the transfer switch in place and restore power to the circuits.
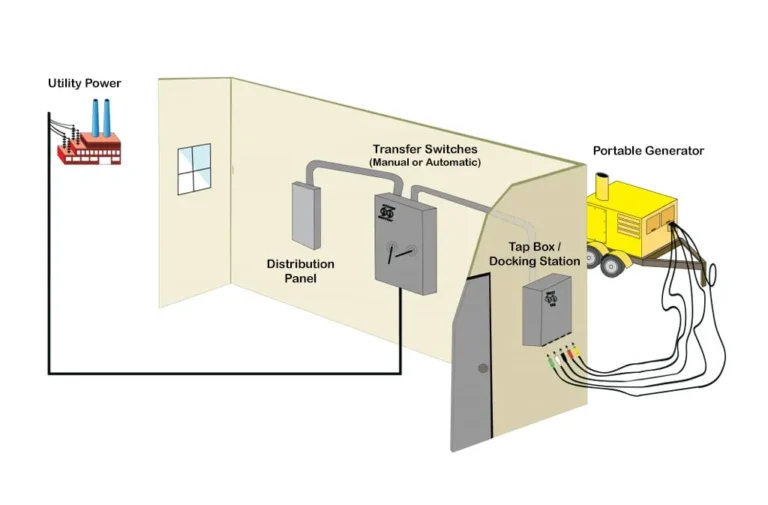
Installing a manual transfer switch can be a great way to keep the power on during an outage. Once you have chosen the right transfer switch for your needs, the next step is to wire it up. This involves connecting the transfer switch to your main panel and generator cables. Here’s how to do it:
Connecting To The Main Panel
To connect the transfer switch to your main panel, you will need to turn off the power to your home. Then, remove the cover from your main panel and identify the circuit that will supply power to the transfer switch. Next, install a double-pole circuit breaker and wire it to the transfer switch. Finally, connect the transfer switch to the circuit breaker and the main panel.
Attaching The Generator Cables
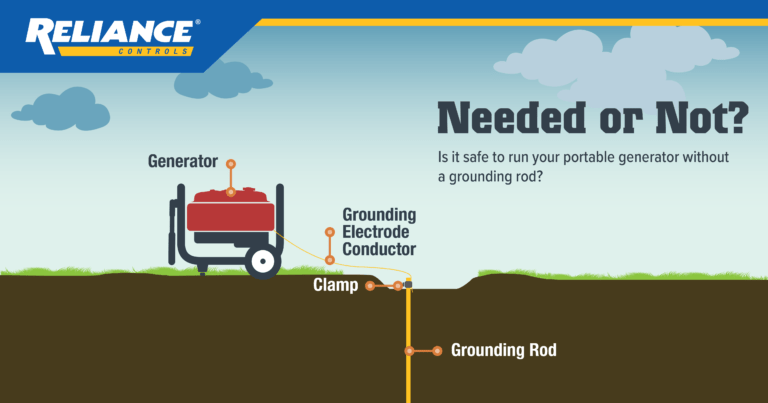
Once the transfer switch is connected to the main panel, you can attach the generator cables. First, turn off the generator and disconnect any cords or cables. Then, connect the power cord to the inlet box and the generator. Finally, attach the ground wire to the grounding bar on the transfer switch.
Remember to test your transfer switch after installation to make sure it is working properly. With these steps, you can install a manual transfer switch and keep your power on during an outage.
Testing The Transfer Switch
Once you have successfully installed the manual transfer switch, it is crucial to perform thorough testing to ensure its proper functionality. This step is essential as it verifies that the transfer switch will work effectively during power outages, allowing you to safely and seamlessly switch between your utility power and backup generator.
Verifying Correct Installation
Before conducting any tests, it is important to double-check that the transfer switch has been installed correctly. This involves reviewing the manufacturer’s instructions and ensuring that all connections are secure and in compliance with electrical codes.
Some key points to verify during installation include:
- Proper wiring of the transfer switch to the main electrical panel.
- Secure connection of the utility power and generator power cables to their respective terminals.
- Correct positioning of the transfer switch in a suitable location, away from potential hazards.
Safety Checks
Prior to testing, it is crucial to prioritize safety to prevent any accidents or damage to your electrical system. Follow these safety checks:
- Ensure the main electrical panel is turned off to avoid any electrical shocks during testing.
- Make sure all individuals in the vicinity are aware that testing is taking place and understand the potential risks.
- Inspect the transfer switch for any signs of damage or wear that may require immediate attention before proceeding with the tests.
By performing these safety checks, you can minimize the risk of accidents and ensure a safe testing environment.
Once you have completed the safety checks, you can proceed with testing the transfer switch to ensure its functionality and reliability.
Remember, testing the transfer switch is a crucial step in the installation process. It ensures that the switch will function correctly when needed and provides peace of mind during power outages. By following the correct installation steps, conducting thorough testing, and prioritizing safety, you can confidently rely on your manual transfer switch to seamlessly switch between your utility power and backup generator.
Maintenance And Troubleshooting
Installing a manual transfer switch is crucial for backup power during outages. To ensure proper installation, it is important to follow the manufacturer’s instructions and hire a licensed electrician if necessary. Troubleshooting may be required if any issues arise during or after installation.
Maintenance and Troubleshooting
Routine Maintenance Tips
Regular maintenance of your manual transfer switch is essential to ensure its proper functioning and reliability during power outages. Here are some routine maintenance tips to keep in mind:
1. Inspect the switch regularly: visually inspect the transfer switch for any signs of damage, such as loose connections, frayed wires, or corrosion. Address any issues promptly.
2. Clean the switch: remove any dust or debris from the switch using a soft brush or cloth. This will help prevent any obstructions that could affect its performance.
3. Test the switch periodically: perform a test run of your transfer switch at least once a month, following the manufacturer’s instructions. This will help you identify any potential issues before an actual power outage occurs.
4. Keep the switch accessible: make sure the switch is easily accessible, and nothing is blocking its operation. In case of an emergency, you don’t want any obstacles hindering your ability to switch between power sources.
Common Issues and Solutions
Despite proper maintenance, you may encounter some common issues with your manual transfer switch. Here are a few problems you might face and their possible solutions:
1. Switch not turning on: if the switch fails to turn on during a power outage, check if the circuit breaker is tripped or if there is a blown fuse. Reset the breaker or replace the fuse if necessary.
2. Inconsistent power supply: if you experience intermittent power supply when using the manual transfer switch, it could indicate loose connections. Inspect the wiring and tighten any loose connections.
3. Switch not transferring power: if the switch fails to transfer power from the utility to the generator or vice versa, check if the switch is in the correct position and if the generator is running properly. Also, ensure that the utility power source is available.
4. Faulty indicator lights: if the indicator lights on the transfer switch are not functioning correctly, it could indicate a problem with the switch or the power sources. Consult the manufacturer’s manual or contact a professional electrician for assistance.
Remember, if you encounter any issues that you are unsure how to handle, it is always best to seek professional help. A licensed electrician can diagnose and resolve any complex problems with your manual transfer switch.
By following these routine maintenance tips and knowing how to troubleshoot common issues, you can ensure that your manual transfer switch remains in optimal condition and ready to provide reliable power during emergencies.
Frequently Asked Questions
Can I Install My Own Manual Transfer Switch?
Yes, you can install your own manual transfer switch. However, it’s essential to follow all safety precautions and local building codes. If you are not experienced with electrical work, it’s recommended to hire a licensed electrician for the installation.
How Much Does It Cost To Install A Manual Transfer Switch For A Portable Generator?
The cost of installing a manual transfer switch for a portable generator can vary depending on factors such as the size of the switch and the complexity of the installation. On average, it can range from $500 to $1,500, including labor and materials.
How To Use A Manual Transfer Switch?
To use a manual transfer switch, follow these steps:
- 1. Ensure the power source is disconnected and the generator is properly connected.
- Turn off all electrical loads in the house.
- Switch the manual transfer switch to the generator position.
- Start the generator and allow it to stabilize.
- Gradually switch on the essential circuits you want to power.
How To Wire Transfer Switches?
To wire transfer switches, turn off power, identify hot and neutral wires, connect wires to the switch, and ground the switch. Test the switch before restoring power.
Conclusion
Installing a manual transfer switch is a crucial step in ensuring uninterrupted power supply during outages. By following the step-by-step guide and prioritizing safety, you can effectively manage the transfer of power sources. This simple yet essential installation can provide peace of mind and convenience for homeowners and businesses alike.